I like Clip Studio Paint, and it’s my go-to tool for comics work. But that’s not to say that I’m not occasionally underwhelmed by some of its features. I have the Ex version. Here’s a list of 10 things I wish were better about Clip Studio Paint.
1. Weird brush settings
There are some default brush settings that I find really annoying, and it’s especially annoying that they’re default options.
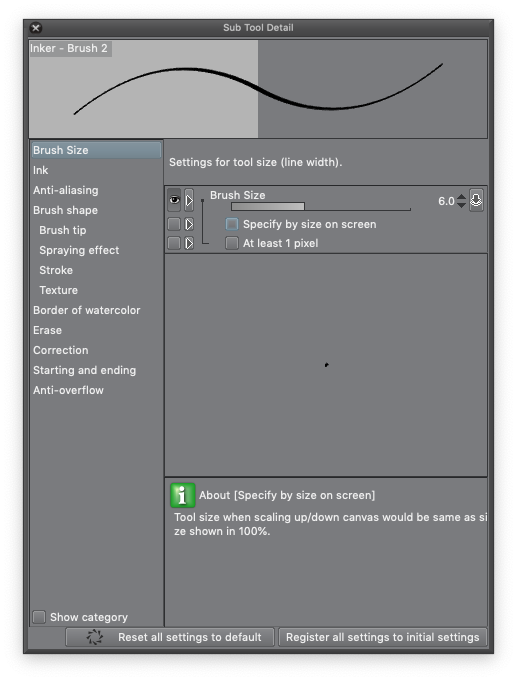
The one that I find most irritating is the setting that makes brush sizes relative to zoom. So if I pick my favourite inking brush and expand it out to 30px — which means that at maximum pressure, the brush is 30px across (unless you’ve turned off pressure sensitivity) — the size is based on screen size, not paper size. So if I zoom in, 30px on the screen represents a larger area of the paper, and the weight of the line appears a lot heavier. If you want consistent line weights, zooming in screws you up. Suddenly everything you’ve inked at the zoomed-in scale is heavier than the lines you ink while zoomed out. I’m sure that there’s a scenario where you might want that, but I suspect that they’re rare. Nonetheless, this option is turned on by default.
I’ve personally found the pen pressure settings to be far too sensitive, and I tend to tweak the pen pressure sensitivity settings on my favourite brushes to reduce the amount that they respond to pen pressure. One of the YouTube artists that I follow, Sara Tepes, uses Krita and her main brushes have pen pressure sensitivity turned off. I don’t think I’m the only one who struggles with pen sensitivity; I suspect that a lot of the “what brushes do you use?” questions are really “when I try this, the brush size goes out of control” complaints.
2. More brush support
The current version of Clip Studio has some really powerful brush support. And this is a major upgrade from the Manga Studio 4 days. I’ve heard many people argue that it wasn’t until Manga Studio 5/Clip Studio that digital painting in the tool was really viable. It’s also true that Clip Studio has some key differences from, say, Photoshop in the way it handles brushes. For example, Clip Studio seems to favour an “amount of paint” concept, whereas Photoshop is much more into “opacity”. Clip Studio supports opacity, but it tends to be hidden by default. (And if I’m honest, I’d say that I’m not 100% sure how opacity differs from amount of paint).
Nonetheless, there are a couple of things that you can do in Photoshop that would probably be nice to support in Clip Studio. For example: dual-tipped brushes.
For that matter, I wish Clip Studio would simply support importing .abr files so that we could directly bring in a set of Photoshop brushes.
(While I’m on the topic of importing brushes, it took me a while to figure out the trick to importing more than one Clip Studio brush at a time. That should be a lot easier.)
3. Better brush (and colour palette) meta-data and organization
I find that I often want to organize my brushes better. The default high-level organization of brushes in Clip Studio is by brush type (pencils, inking brushes, paint brushes) with some sub-categories under that (watercolour brushes, oil brushes, etc). I usually want to use organization methods to help keep track of things like “Where did I get this brush from?” (Clip Studio Assets, Frenden, Flyland, Magda, etc.). Any time Frenden releases updates to his brushes, I’m always trying to figure out all of the different places I have a copy of that brush. I also tend to care about things like “what are the original settings of this brush, and what did I tweak them to be?”.
Lastly, I also want to organize brushes into “these are my favourite, go-to brushes.” My favourite pencils, favourite inking brushes, favourite colouring brushes, and so forth. That’s a lot of different ways of organizing brushes, and the current mechanism doesn’t really easily support that many categories. Perhaps meta-data would help? If my Frenden brushes could stay tagged with meta-data info — Frenden’s name, what website did I get it from? What bundle did it come from? — I’d be a happy camper.
In fact, while I’m on the topic of organization and meta-data, I have a similar complaint about the colour palettes. I can create colour palettes and give them names. Here’s a palette I created, for example — a Zorn palette:
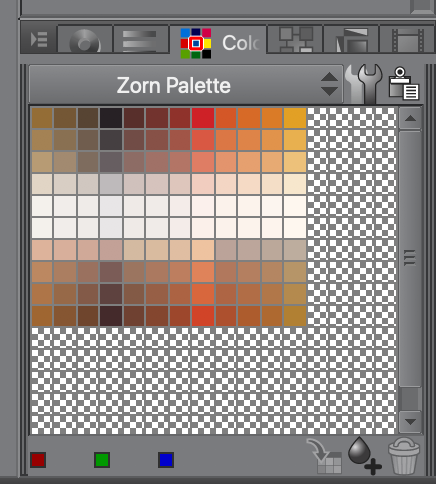
Note how the layout of the colours means something. When using actual paint, most people construct a Zorn palette as a set of swatches with this basic layout. I used to be afraid that if I resized the palette window, the organization of this palette would get messed up, fortunately it does not.
But I also wish I could have a bit more data/info about the colours in my palette. Let’s say I’m colouring DC Comics. Wonder Woman has a palette of colours: hair colour, skin colour, eye colour, a specific red, gold and blue for her costume. Plus highlights and shades. I could wing it. Or I could pick the colours off of a previously-coloured page. But why can’t I label my colour palette so that all of these colours are clearly arranged?
Why can’t I keep groups of colour palettes (e.g.: “the character colour palettes for project X”)?
4. Dual monitor
If you have a Cintiq, you almost certainly want Clip Studio running on the display on the Cintiq. The Clip Studio website recommends that you make the Cintiq the default monitor in your set up.
The Cintiq is nice, but it’s not the best monitor in my home computer set-up. I’ve got a 27 inch 5K Retina iMac. That’s a nice monitor. So it’s the one I want to be the default monitor. Unfortunately using Clip Studio on my non-default monitor is not as simple as I want it to be.
I can move all the tool windows on to the Cintiq, except for the top bar, which refuses to leave the default monitor. And it’s a bit of a laborious process, moving a bunch of windows over one at a time. Fortunately, if I stop and restart Clip Studio, those tool windows will return to the Cintiq monitor. But if something gets messed up with my window set-up, and I need to restore to default, then I need to go through the process again.
Opening up files in the editor is a bit more irritating. The first file I open in Clip Studio (after starting) wants to open on the default monitor. I can drag it over to the other monitor, and then additional files will open on that monitor. But if I shut down Clip Studio and restart it, the next editor window will start on the default monitor again.
I feel like this should be a lot easier.
5. Improvements for panels
Clip Studio has some really interesting tools for drawing panels (but they use the nomenclature of “frames”, which I think results in people Googling the wrong thing to find out how to make panels in Clip Studio).
Clip Studio has two “modes” for working with panels: one mode tries to treat each panel as its own drawing, and will create a new background layer, drawing layer and clipping mask for each panel (and it’ll organize these layers into a panel-specific folder). The clipping mask is particularly nice, because it means that any lines you draw in one particular panel won’t cross over into a second panel. Nonetheless, this isn’t my favourite mode, because it ends up creating a lot of complexity in the layers view. The other mode just treats the panels as a decoration on top of your drawing layers.
Things get a bit tricky in the second mode when you want panels to overlap (or worse, if you decide you want a panel without borders). In that second mode, if you want the second panel to overlap the first panel, there’s no clear way to force one or the other to be “on top”. Sometimes the order you move them in affects which one is “on top”. But sometimes you just get into a situation where you can’t force one to be on top of the other. In practice, you’re better off dealing with the first mode, or a blended mode (where panels that have overlaps have their own folders); if you want a particular panel to be on top, the layers view can help you out.
Another annoyance about frames: Clip Studio has a really cool tool that allows you to take a frame and divide it into equally-sized subframes (this tool is, sadly, a bit hidden and hard-to-find).
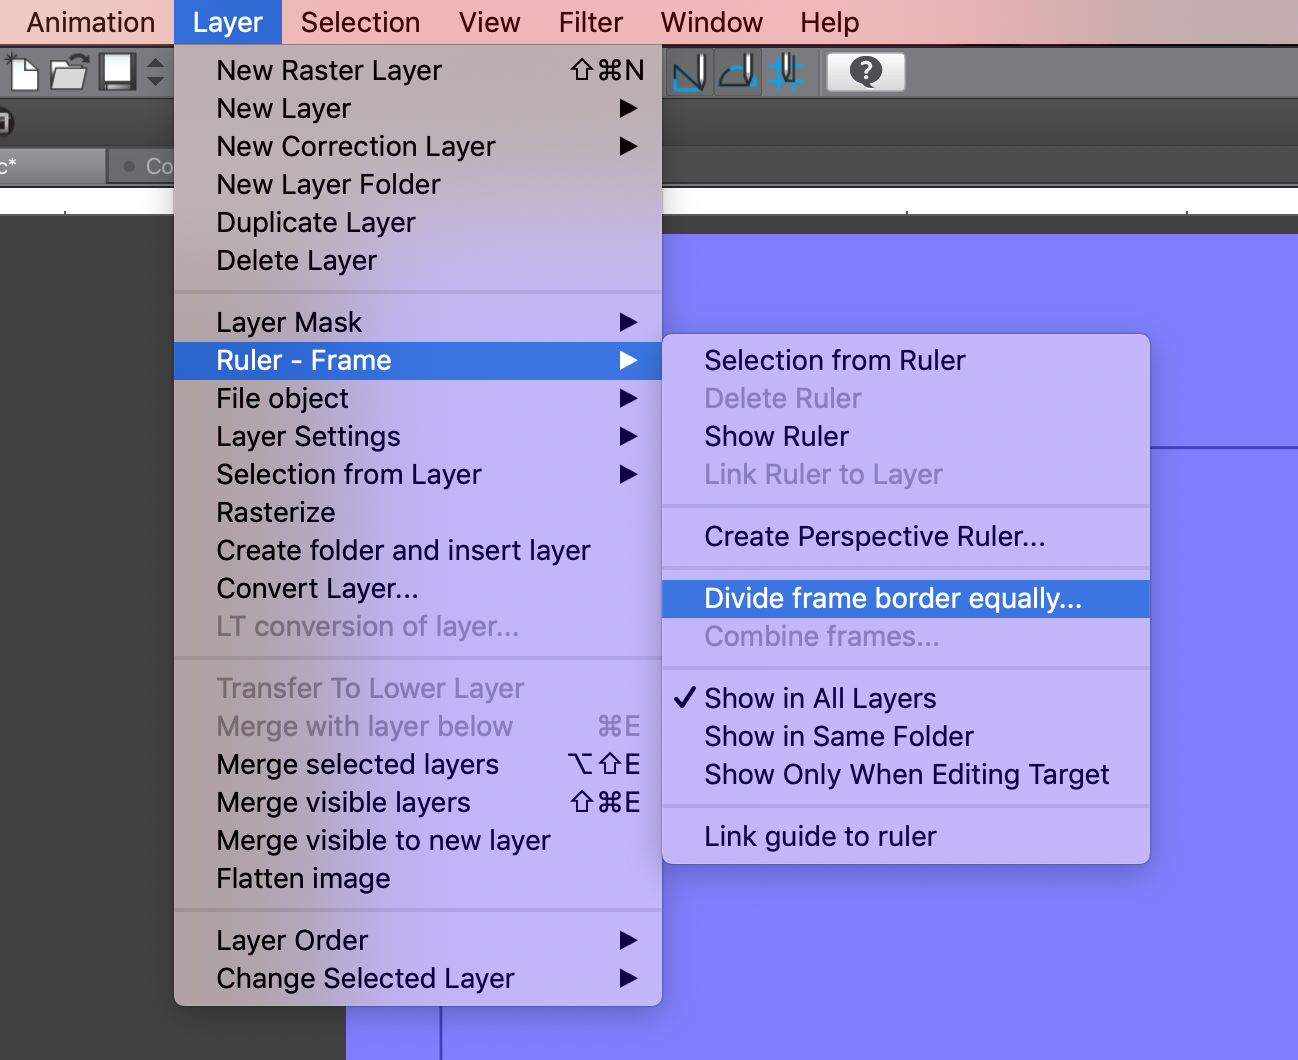
So if you want to go for a classic Watchman-esque 9-panel grid, you can draw a big frame and then use the divide-equally tool to divide it into 3×3 subframes, and it’ll figure out where to draw the lines so that all the frames are the same size.
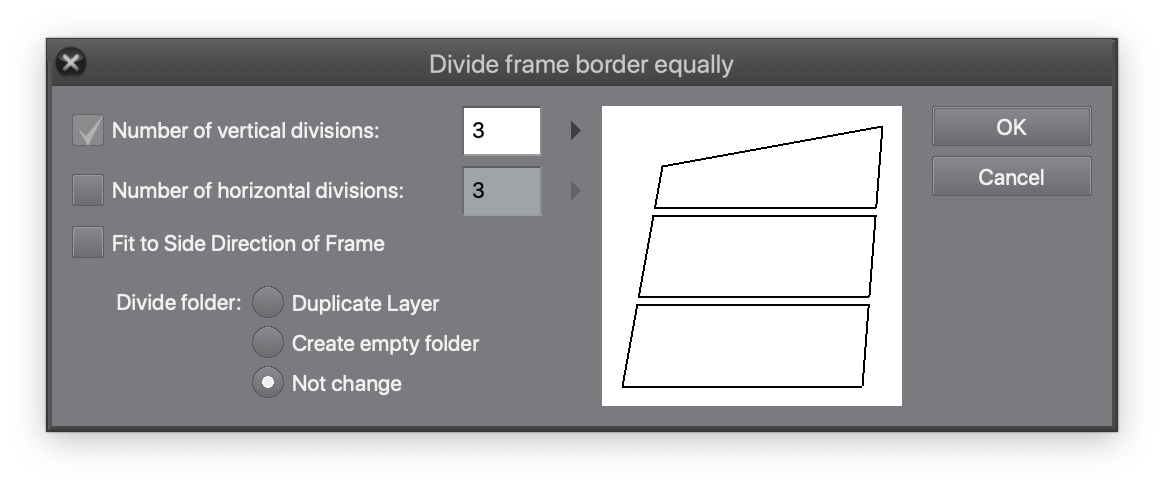
My beef? Controlling the size of the gap between frames is super-opaque. You basically have to go in to preferences and set that size as a global setting for Clip Studio. That also means that you end up changing it a lot if, for example, you have projects that use different measures for gap size, or if you thumbnail at a different size than the size you use for final art.
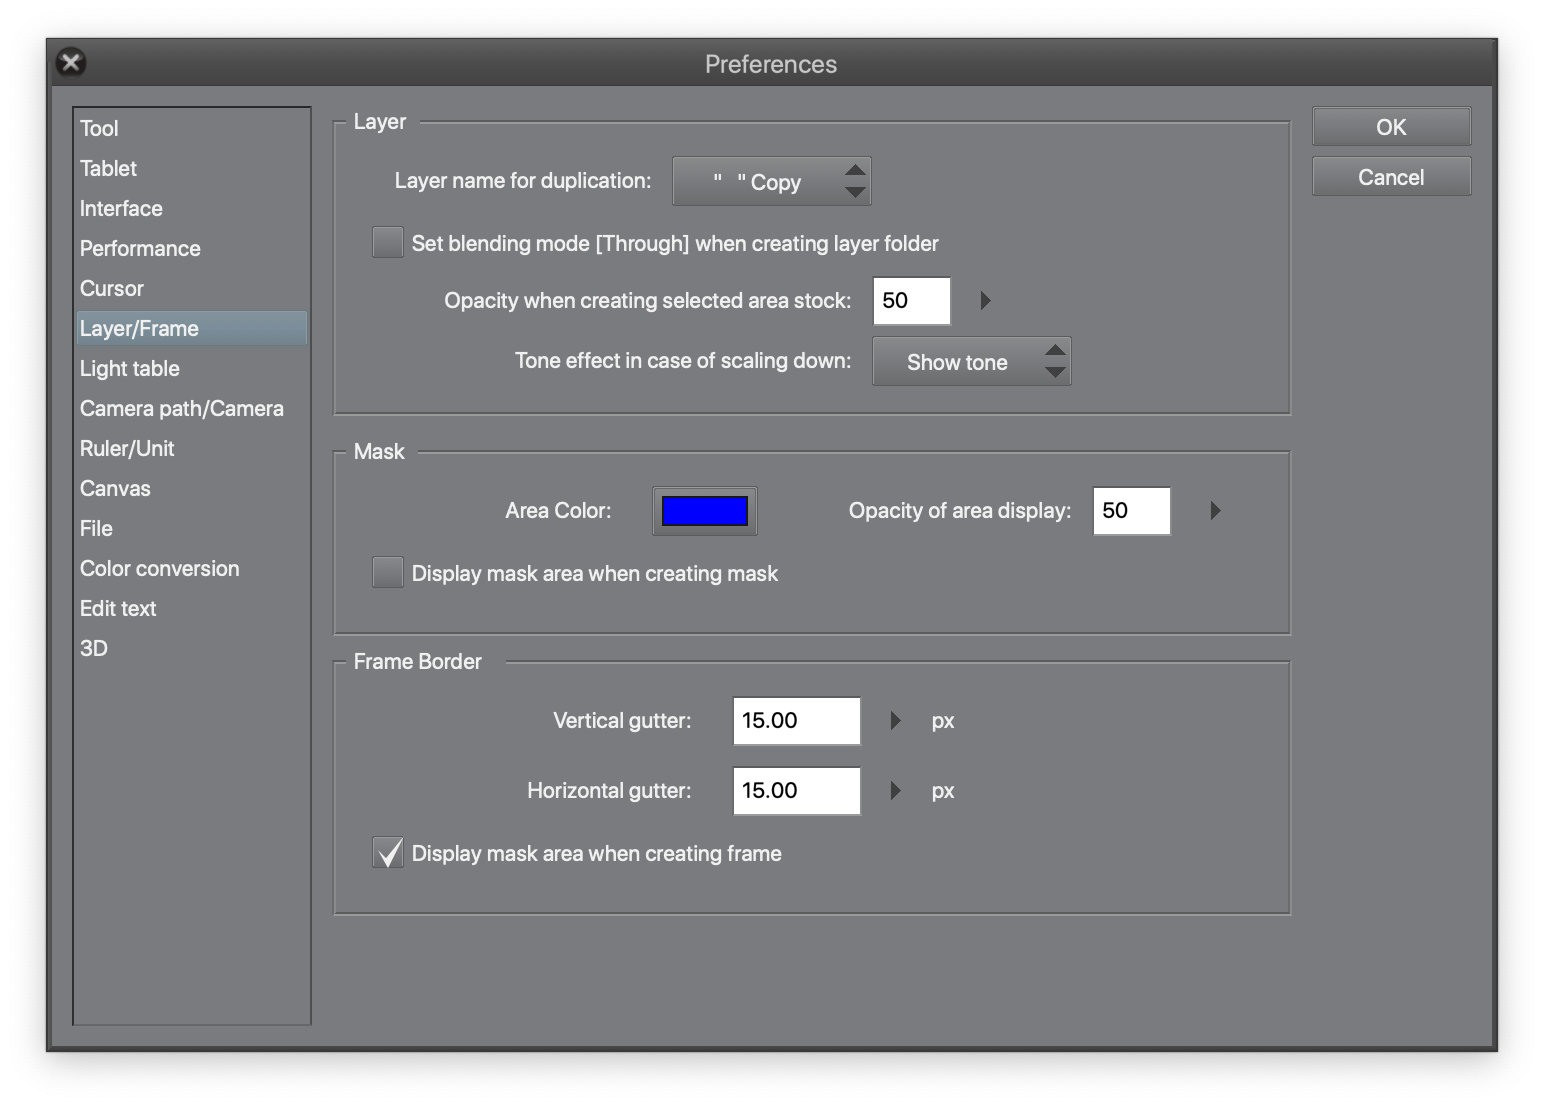
Why can’t we have a “size” field on the dialog box?
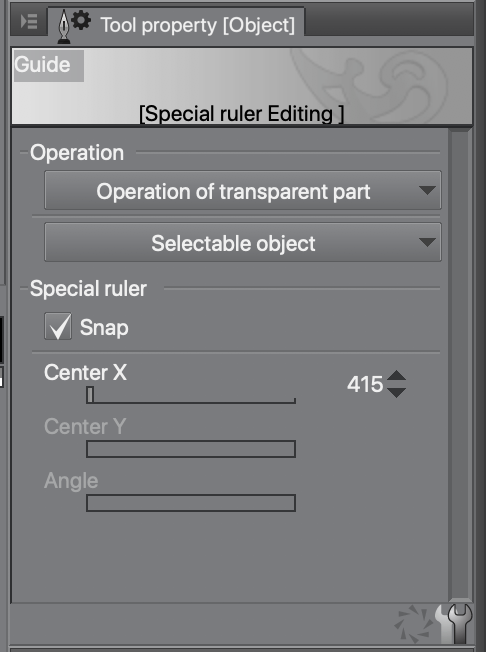
I confess that I wish I had a bit more precise control over the original placement of the panel edges. I wish the “Divide Frame Border” tool would snap to guides, for example. For a lot of folks, being off by a handful of pixels isn’t that big of a deal. That’s not me, sadly. For this reason, it’s been hard to completely abandon Illustrator for panel layouts because it’ll do exactly what I want it to do, although Clip Studio’s “divide frame equally” tool is a powerful beckoning call.
At the moment, I’m using the frame tool for thumbnails, and as I get more comfortable with it, I may just give up on Illustrator entirely.
6. Fix the fucking inches ruler!
In Clip Studio, there are two types of rulers: rulers that guide how your drawing tools behave (e.g. perspective rulers or general straight-edges) and the rulers that appear at the top and left side of the editing window, showing you the scale of the page. For this point, I’m talking about the latter thing.
Anyway, that being said, this is probably my biggest irritant with Clip Studio. As a North American who deals with paper sizes measured in inches, I tend to use the window rules set to inches. Sadly, the inches ruler has no subdivision marks. Here’s what it looks like:

That’s… not as useful as I’d like it to be.
If I use pixels, here’s what it looks like:
![]()
Look at all those subdivision marks! Halleluja!
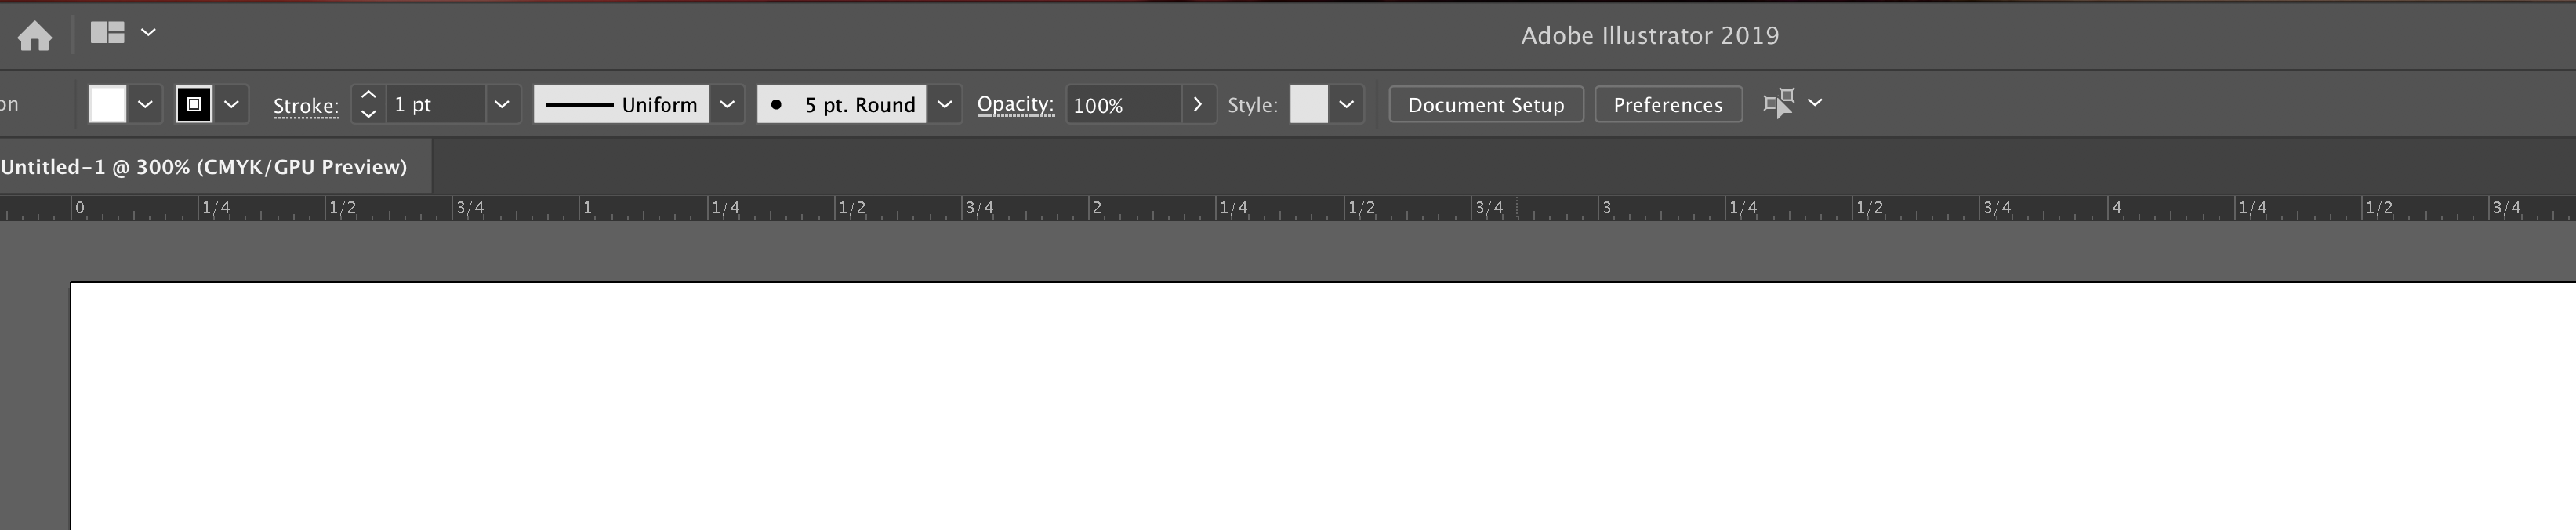
And here’s Illustrator:

Notice how, when I zoom in on Illustrator, I get more subdivision marks:
Please fix this. Please please please fix this.
7. Better handling of measures, generally
I wish there was better handling of units, in general. I mean, you can say you want to open a new page, at 11 x 17 inches at 600dpi (or whatever), but really the interface only thinks about pixels. If I want to set a panel gap size of .2 inches, why can’t I type that into tool properties window and expect Clip Studio to figure out that I mean 120px? Similarly, if I pull out a guide, and then select it to set its location more precisely, I feel like I should have the option to say that I want the guide at exactly .75 inches without having to do the math in my head that translates that to 450px.
(A thing I miss from Illustrator: when I pull out a guide and use the Shift key, it snaps to the subdivisions visible in the window ruler).
8. Move rulers, improved ruler inference
Let’s talk about the other kind of ruler: the ones that help you draw very specific lines. Generally, Clip Studio has amazing ruler tools. Any time I want to ink a nice clean curve, I drop down a curve ruler to get the precise curve I’m looking for.
I wish that moving those rulers was easier. For example, say I have a vertical cylinder. The top of the cylinder forms an ellipse. I can arrange an elliptical ruler over the top of the cylinder and draw a nice clean ink line to get a perfectly curved top. Now I want the exact same curve on the bottom of the cylinder. If the ruler figure is small, then it’s sometimes hard to select the ruler without hitting one of its handles. And if you accidentally move a handle, the ruler will deform (fortunately, that’s what ⌘Z is for).
And as much as I want to love the perspective rulers that everyone raves about, I find that I get frustrated by the inferencing of those rulers. I’m often trying to lay down a line on a 3-point perspective ruler, only to have the line start moving in the wrong direction because it couldn’t figure out that I was going toward one of the other points of perspective. I often find myself trying to turn off a particular direction to make it easier to get some lines going the right way. And doing that without inadvertently moving a perspective line is tricky.
9. Improved placement of things, especially vector handling
In general, I wish I had mechanisms to place things a bit more precisely than “there looks good”. This is especially true of anything vector. If I grab a control node on a vector line, why can’t I know the precise x,y coordinates of that node? And why can’t I change the location by typing in a new x or a new y?
I want to be clear that Clip Studio’s handling of vector lines is amazing, especially compared to Illustrator. The ability to move bits, erase parts of the line, and change the line weights are incredible, and an order of magnitude more sophisticated than anything I’ve seen in other tools. I just want more precision around control nodes.
10. Measure a line
One more item in the precision camp. I wish there was a tool that allowed me to measure things.
Take this example: say I’m drawing a person, and I feel like the figure’s head is too big. I’d love to be able to drop a tape measure tool down so that I can measure the relative sizes of, say, legs and head (because, as we know, the head height is about a quarter of the height of the legs). Sure, developing an eye for that comes from experience; but I’m often not there yet and if I could just measure something, I’d be a lot happier. I think that SketchUp has spoiled me on this front.